Sometimes, you need to turn a piece of paper into a digital file. Maybe you need to include a receipt, registration, or other form of proof in an online form. Or, you want to keep copies of your important documents in the cloud, so they’re always accessible and safe from being lost or destroyed. Such documents are often digitized as Portable Document Format files (or PDFs).
It used to be that you needed to use either dedicated hardware or a third-party iPhone app to take a photo of a document and convert it to PDF. Apple has added a very handy document scanner into the Notes and Files apps, and it does a surprisingly good job of capturing most documents and converting them to PDF. Because it’s not very obvious, you’d be forgiven for not even knowing it exists. Here’s how you scan, convert, and store documents with Notes or Files.
Scan a document and save it as a PDF with Notes or Files
You can scan a document into Notes and then save it as a PDF (if you want to), or you can directly scan a document into the Files app as a PDF.
- Time to complete: 5 minutes
- Tools required: iPhone with iOS 11 or later
- Cost: 0
Create a new note and add scan

Foundry
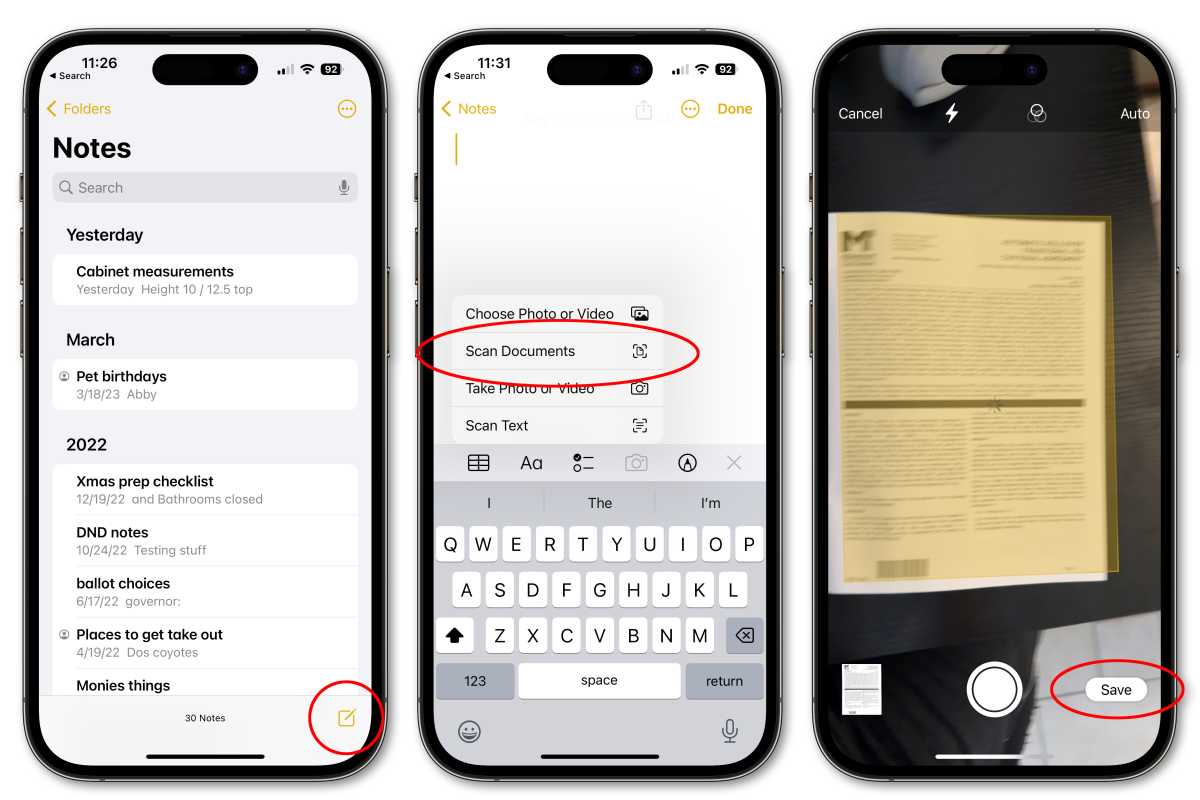
- Open Notes and create a new Note (or open a Note to which you wish to add a scan).
- Tap the Camera icon and then choose Scan Documents.
- Hold your iPhone over your document until it is highlighted. You can press the shutter or hold your iPhone (or iPad) still until the scan captures automatically.
- Drag the corner to adjust the scan then tap Keep Scan. You can add additional scans or tap Save.
Export scan from Notes to Files as a PDF

Foundry
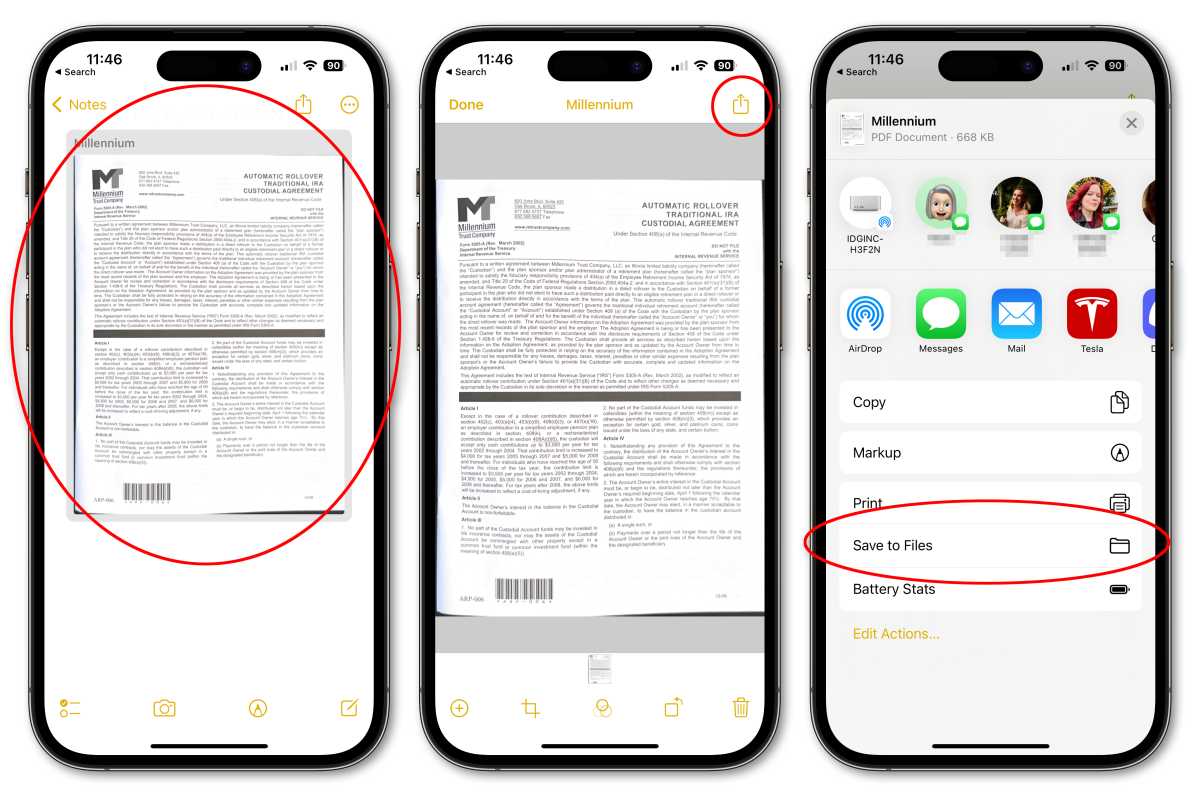
- Open a Note with a scanned document.
- Tap the scanned document, then tap the share button in the upper right.
- Choose Save to Files.
- Select a folder within Files in which to save your PDF. Give the file a name (and tags if you wish) at the bottom of the screen.
Scan directly into Files

Foundry
If you don’t want to save your scan in Notes, you can directly scan into Files, where your document will be saved as a PDF. You can then share it to other cloud services if you wish.
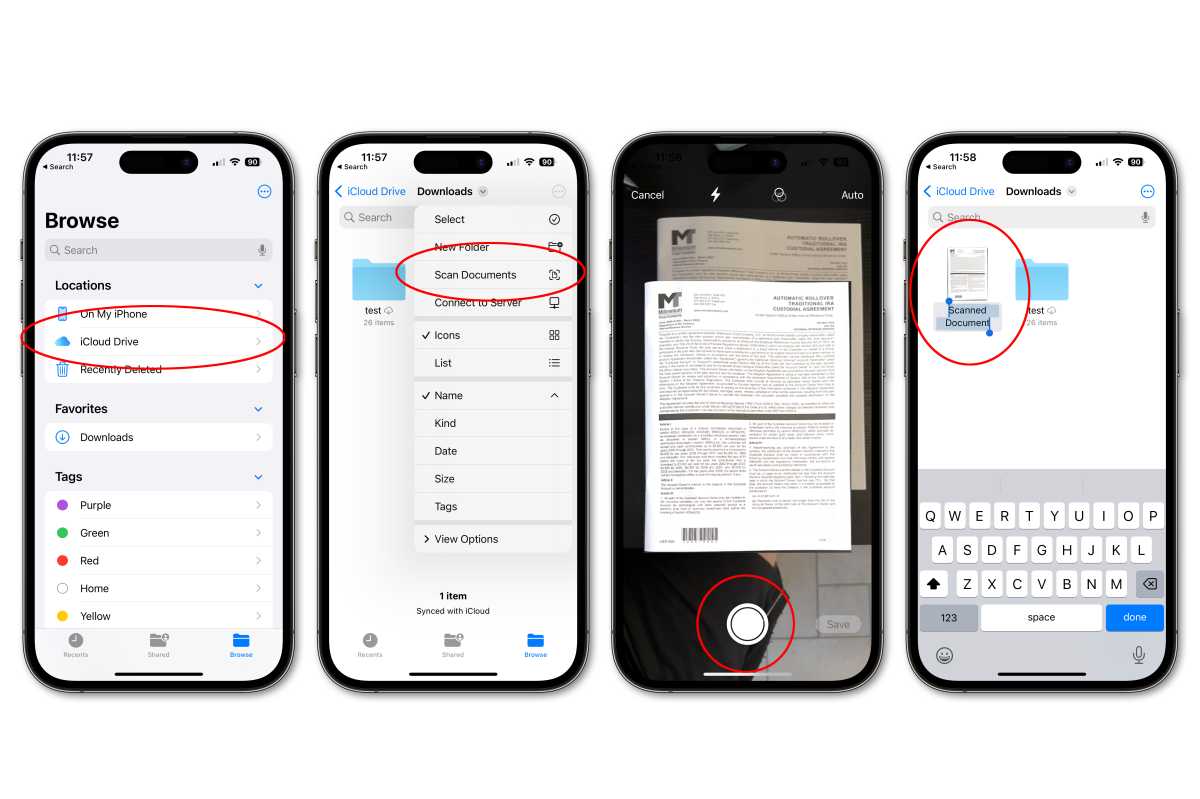
- Open Files, then choose a location to save your scan.
- Tap the more button (…) in the upper right, and choose Scan Documents.
- Line up your document and tap the shutter, or hold still to automatically capture the image. If you use the shutter, you can drag the corners to adjust and tap Keep Scan.
- Add additional scans as you want, and tap Save when you’re done.
- The scan will be saved in your chosen location as a PDF, and likely named “Scanned Document.” The name will be highlighted so you can easily change it.
- After creating your scan, you can select it and use the share button to send it to other cloud services, if desired.
Sometimes, you need to turn a piece of paper into a digital file. Maybe you need to include a receipt, registration, or other form of proof in an online form. Or, you want to keep copies of your important documents in the cloud, so they’re always accessible and safe from being lost or destroyed. Such documents are often digitized as Portable Document Format files (or PDFs).
It used to be that you needed to use either dedicated hardware or a third-party iPhone app to take a photo of a document and convert it to PDF. Apple has added a very handy document scanner into the Notes and Files apps, and it does a surprisingly good job of capturing most documents and converting them to PDF. Because it’s not very obvious, you’d be forgiven for not even knowing it exists. Here’s how you scan, convert, and store documents with Notes or Files.
Scan a document and save it as a PDF with Notes or Files
You can scan a document into Notes and then save it as a PDF (if you want to), or you can directly scan a document into the Files app as a PDF.
- Time to complete: 5 minutes
- Tools required: iPhone with iOS 11 or later
- Cost: 0
Create a new note and add scan

Foundry
- Open Notes and create a new Note (or open a Note to which you wish to add a scan).
- Tap the Camera icon and then choose Scan Documents.
- Hold your iPhone over your document until it is highlighted. You can press the shutter or hold your iPhone (or iPad) still until the scan captures automatically.
- Drag the corner to adjust the scan then tap Keep Scan. You can add additional scans or tap Save.
Export scan from Notes to Files as a PDF

Foundry
- Open a Note with a scanned document.
- Tap the scanned document, then tap the share button in the upper right.
- Choose Save to Files.
- Select a folder within Files in which to save your PDF. Give the file a name (and tags if you wish) at the bottom of the screen.
Scan directly into Files

Foundry
If you don’t want to save your scan in Notes, you can directly scan into Files, where your document will be saved as a PDF. You can then share it to other cloud services if you wish.
- Open Files, then choose a location to save your scan.
- Tap the more button (…) in the upper right, and choose Scan Documents.
- Line up your document and tap the shutter, or hold still to automatically capture the image. If you use the shutter, you can drag the corners to adjust and tap Keep Scan.
- Add additional scans as you want, and tap Save when you’re done.
- The scan will be saved in your chosen location as a PDF, and likely named “Scanned Document.” The name will be highlighted so you can easily change it.
- After creating your scan, you can select it and use the share button to send it to other cloud services, if desired.


